
")
By: airbender.btc
I have been following Bittensor for quite a while, but I never decided to develop on it. Even though I had some expertise as a machine learning engineer, I never looked deeply into Bittensor. That must have been aided by how sophisticated and expensive it looks to me at the point.
Two weeks ago, I decided to take the bold step, even if I won’t be a developer, I should at the very least fully understand how Bittensor works and what it takes to be a developer on the network.
In the coming weeks, I will be dropping writeups on how to interact with Bittensor based on how I am interacting with the network.
Why stake manually?
You might be asking this question: why stake manually? Isn’t that stressful? Well, it isn’t. Staking manually provides added security compared to staking platforms, plus there’s less risk of compromise. Also, GUI-based staking (like using Taostats) will incur more fees compared to manual staking.
Staking on Bittensor: A beginner’s guide
Staking $TAO is not as complicated as you might think. Here, I’ll guide you on how to stake your tokens yourself, reducing the risk of scams. Do-it-yourself (DIY) is the best way.
I will be using a Windows laptop as a guide (I think that’s what most people use). To interact with Bittensor on a Windows laptop, you have to install WSL 2.0, which is a Linux environment.
Why do we need this? Well, because Bittensor only works on the Linux operating system. WSL makes it possible for Windows operating system users to use Linux on their laptops. To install WSL 2, follow the steps in the documentation under “Install on Windows” or install through https://learn.microsoft.com/en-us/windows/wsl/about.
Once Ubuntu is installed, launch it. Install Python 3 and pip using:
sudo apt update
sudo apt install -y python3 python3-pip python3-venv
Confirm the installation using:
python3 --version(this will display the Python version installed; if it doesn’t display, that means installation is not yet successful).

Create a virtual environment to avoid dependency issues. Do this using the commands:
python3 -m venv btsdk_venv
source btsdk_venv/bin/activate
Next, we’ll set up a Bittensor SDK, create a Bittensor wallet, all while in your laptop’s terminal. Run the command:
pip install bittensor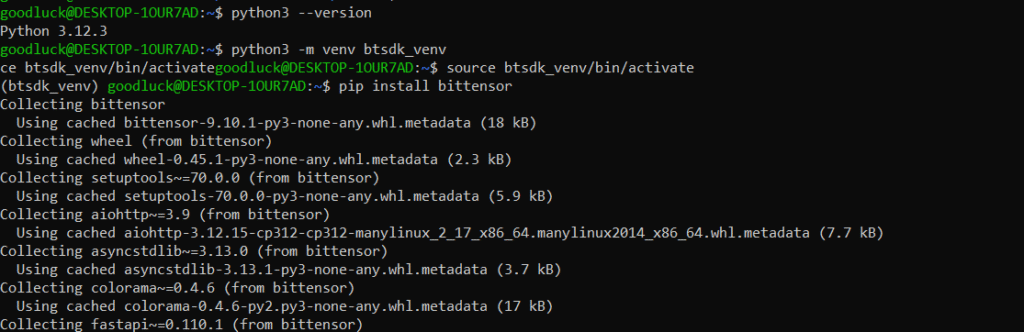
This will install Bittensor SDK (btcli). Confirm the installation using:
“python3 -m bittensor” or “btcli --version”. This will display the SDK version.

For the purpose of this guide, I will be operating on the testnet. To configure the testnet (mainnet or testnet), run the command:
btcli config set --network test (set to testnet)To get several commands info, run:
btcli wallet --help (get several commands info)Creating or restoring a wallet
You can either create a new wallet or import a wallet if you already have one with the mnemonic phrases (for both the coldkey and hotkey). The coldkey is like your main wallet, which stores your tokens. The hotkey is like a worker wallet, which you will use for mining and validating. Note: Your CEX wallet address is not used here.
To create a new wallet, run the commands:
btcli wallet create_coldkey --wallet.name mywallet This creates a coldkey. Follow the prompt, set a password, and write down your mnemonic phrase somewhere safe (mywallet is the name of the wallet, you can change this to your preferred name).
btcli wallet create_hotkey --wallet.name mywallet --wallet.hotkey myhotkeyThis creates the hotkey for the coldkey you created. Write down the mnemonic phrase for the hotkey also.
If you already have a wallet, you can restore it using:
btcli wallet regen-coldkey --wallet.name mywallet (restore coldkey)
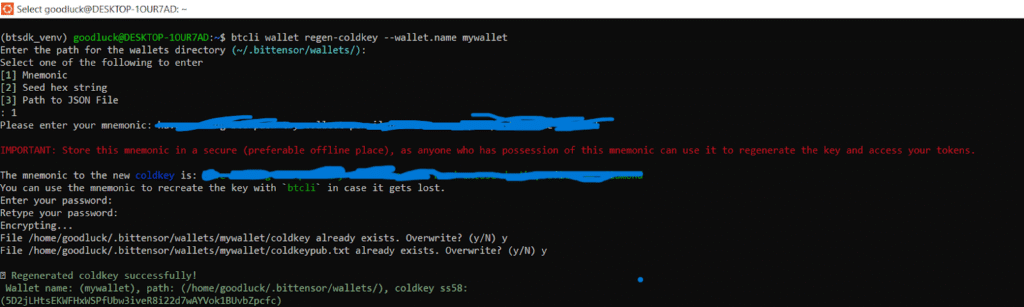
btcli wallet regen-hotkey --wallet.name mywallet --wallet.hotkey myhotkey (restore hotkey)

Note: If on mainnet, you can transfer your $TAO to the coldkey wallet address. If on testnet, you can request for testnet token at: https://app.minersunion.ai/testnet-faucet, enter your coldkey address to receive testnet $TAO.
Check your wallet balance using:
btcli wallet balance --wallet.name mywallet --subtensor.network test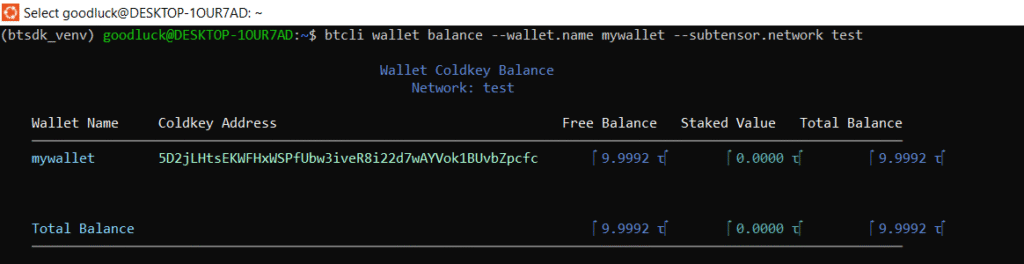
For mainnet, replace “test” with “finney” (Note: finney is the default mainnet network name). If the network is not specified, it might throw an error (“name or service not known”)
Staking TAO directly like a Validator
Note: For your stake to earn APY reward, you need to run a node (guide coming soon).
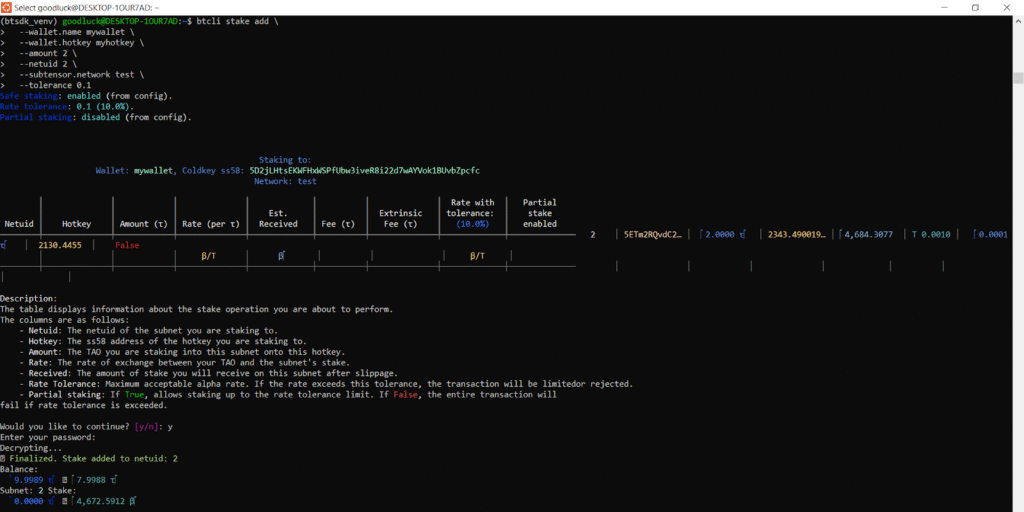
To stake your $TAO tokens on a specific subnet, use the following command:
btcli stake add \
  --wallet.name mywallet \
  --wallet.hotkey myhotkey \
  --amount 2 \
  --netuid 2 \
  --subtensor.network test
A netuid (network unique identifier) is a unique number assigned to a specific subnet within the Bittensor network. To find available subnets, run:
btcli subnet list --subtensor.network testIf the hotkey hasn’t registered on the subnet (netuid) you’re using, it will most likely fail. Registering on mainnet may require small amount of $TAO.
It might throw an error “InsufficientLiquidity”, this means there’s no more staking slot on the subnet since the subnets have limited slots. You can try another subnet (e.g., –netuid 3) or wait some time for other users to unstake.
It might also throw the error: “SlippageTooHigh(Module)”. This means there’s a lot of volatility (which is common on testnet, might not be an issue on mainnet), and the default slippage (0.05) is too strict. You can introduce a new slippage tolerance by increasing the slippage.
btcli stake add \
  --wallet.name mywallet \
  --wallet.hotkey myhotkey \
  --amount 2 \
  --netuid 2 \
  --subtensor.network test \
  --tolerance 0.1
Staking should be successful.
To check your position or staking reward, run:
btcli wallet overview --wallet.name mywallet --subtensor.network test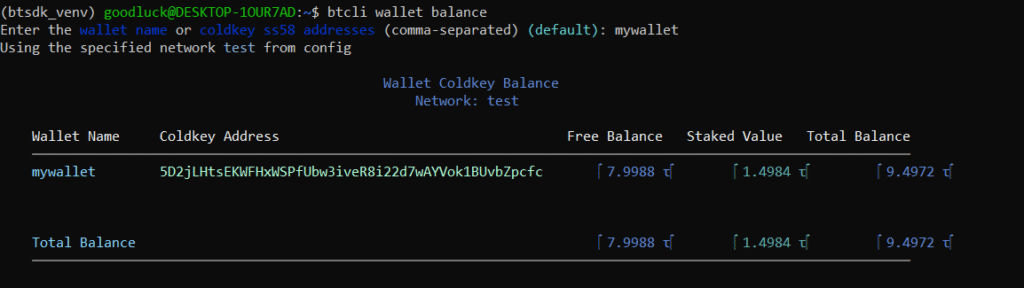
The next guide will focus on unstaking our $TAO. Thank you for following.
Enjoyed this article? Join our newsletter
Get the latest Bittensor & TAO ecosystem news straight to your inbox.
We respect your privacy. Unsubscribe anytime.


Be the first to comment